 Continuing the pattern begun with my novel The Sword in the Stone-Dead, I spent ages working on a cover for this book, that I then abandoned in favour of something different. Have a look at the unused cover – which illustrates a scene from the beginning of the novel – here.
The damaged robot on the cover of Robot Wrecker was created in Photoshop, with a bit of additional re-touching done in Procreate on the iPad Pro with the Apple Pencil. For the most part it is a collage of photographs of bits and pieces that I found in my own collection and in my dad’s workshop.
I had in mind that I wanted to create something that was similar to C3P0 from Star Wars and a Cyberman from Doctor Who. I think both of these probably owe something to the amazing design of the robot Maria from Fritz Lang’s Metropolis. I also Googled images of robot heads for inspiration, and then drew a very basic sketch to serve as the basis for my design:

The eagle-eyed will spot that this bears very little resemblance to the final image. The rough ‘arrow’ at top left was to remind me of the direction of the main light source, so that my shadows would be consistent. The lines below the neck were meant to indicate the presence of wires, where the head had been torn off by the ‘robot wrecker.’ And the lines on either side of its ‘ears’ were meant to indicate that the head was held in a vice on a repair shop workbench. The next step was to try and create this as an image in Photoshop and Procreate. I didn’t trust in my abilities to create a digital painting from scratch, so I decided to put together a collage of photographed elements as a starting point.
The whole thing started off with drugs. Not taking them, just photographing the packaging of a couple of different sorts of over-the-counter medication. The main shape of the head and the dent in it, were taken from this picture:

I used one of the intact capsules, and one of the dented ones.

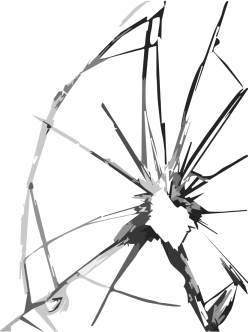
The ‘slash’ or tear in the robot’s face was taken from the packaging of another medication:

Then I used Photoshop’s ‘distort’ tool to stretch out the shape into something more head-like. I also sliced off the left and right sides:

I took this image into Procreate to smooth out the joins between the elements that I had pasted together. The next stage was to add the eyes: I had a couple of attempts at this before I came up with something that I was happy with. I started by trying to create a cross between a camera lens and the eye of HAL from the movie 2001:

This was based on a photograph of the front of my Creative computer speakers, but I decided that this wasn’t quite what I was looking for. Instead I chose an image of the light at the end of the Doctor Who sonic screwdriver that a friend bought me a few years ago:

My first attempt at adding these to the robot head involved another element, a photograph of an eyelet from the top of the sleeve that held one of my metal rulers:

Combining these elements, I was able to come up with something that looked really, really rubbish!

I needed to find a better way of creating the eye sockets, so that they seemed better integrated into the head of the robot. This turned out to be pretty easy: I made a couple of circular selections in Photoshop, and used the ‘bevel and emboss’ feature to create this:

I then pasted the blue ‘eyeballs’ from the photographs of the sonic screwdriver into the circular holes in the head.
I thought I should emphasise the damage to the head by having the eye lens being smashed. I tried capturing an image of smashed glass by creating cracks in a plastic box lid (it didn’t look convincing) and by hitting an old watch face with hammer (it disintegrated into powdered glass!), but finished up by using one of my photographs of a broken window (from an old building in Nottingham), which I eventually converted into a white outline with a black drop-shadow, and that I distorted to try and make it look like a curved lens rather than a flat pane. Here’s the photograph, saved as basic outline – I painted out most of the image in Procreate, so that I ended up with just this. I was a lot of work, but this gives me something that I can reuse in other images where I need broken glass.
Having sorted the eyes, my robot now needed some kind of ears on the side of its head. A close-up of the head of an old PC microphone gave me what I wanted. I squished it so that it was much thinner than the original image, making something that was barely recognisable as a microphone:

The mouth was a couple of ellipses, offset to give the impression of a thickness of metal, with a photograph of a bit of speaker grilled (from a webcam) inserted into it.
The main part of the neck was made from a photograph of a rubber grip for a pencil, that I squashed down and changed the colour of. I could have used the hose of a vacuum cleaner, but that would have meant getting the hoover out of the cupboard.
The rest of the neck is made up from photographs of an old radio aerial:

This was squashed to make it shorter and fatter. I used this four times, rotated and flipped to make sure the darker shadows were on the correct side each time. To these I added a bit from the neck of a desk lamp:
 And a shot of a jumble of wires from something in my dad’s workshop:

These bits were isolated by painting out the backgrounds in Procreate.
Originally I’d intended to have the head held in a vice – an idea I’d seen in a couple of the images I found in my Google image search, and I got as far as creating one side of the vice from a photo of a knurled scalpel handle and a drill head: But in the end, I decided that I didn’t need the vice, or the rack of tools that I had intended to put in the background. I don’t claim to have achieved anything like perfection with this image, but I did have in mind the quotation from Antoine de Saint-Exupery, that I saw on a design website recently: “Perfection is achieved not when there is nothing more to add, but when there is nothing left to take away.”
I thought I could give a hint of the humour in the novel by adding the ‘Ouch!’ text to the dent on the robot’s head. A few years back, every car I saw that had a dent in it, had ‘Ouch!’ scrawled on the damaged bodywork. I found a nice brush font to create it, rotated it to the right angle, and then used the ‘distort’ tool again to try and make it look like the text was actually on the curved metal surface.
Adding a couple of lens flares helped show that while it was damaged, the robot wasn’t yet completely ‘dead.’
I created a simple background image – shining a virtual spotlight on a dark background, then adding a ‘mosaic’ filter, and then blurring the image to soften the squared texture of the background.
The final step was to add the lettering. I tried a number of different text effects until I got a metallic finish that I liked, and I probably tried a couple of dozen different fonts before I got something that I was happy with.
And that was pretty much it. The final image doesn’t look much like the initial sketch, but I think it turned out pretty well despite that. Using bits from photographs meant that I was able to create the image in less than half the time it would have taken me to create a digital painting from scratch, and somehow – more by luck than judgement – I managed to create something that strikes the right balance between realism and a sort of cartoony humour, which suits the tone of the novel perfectly.
